As the crispy autumn leaves cascade down from the trees, my mind drifts to comforting, hearty meals that warm me from the inside out. When I think of classic fall and winter dishes, a beautifully prepared pork roast often comes to mind. However, traditional oven roasting can dry out the lean pork loin, especially the bone-in cuts. I used to struggle with getting the center to temperature without turning the outer portions to leather. That is until I discovered sous vide cooking. This innovative technique revolutionizes sous vide pork loin roast and helps it reach succulent, fall-off-the-bone quality with little effort. You’ll learn all my tips and tricks for flawless sous vide bone-in pork loin roast. From start to finish, I walk you through selecting the perfect cut, prepping like a pro, dialing in the right time and temperature, searing for a crispy crust, and more. You – and your dinner guests – will be amazed at the moist, delicate texture you achieve. This foolproof recipe removes the fear and stress from cooking this lean cut. Before we begin, let me whet your appetite by describing the absolute tender decadence waiting for you.
Sous Vide Pork Loin Roast Bone-in Recipe
Here’s what you’ll need:
- 2.5-3 pound bone-in pork loin roast
- 1 tablespoon olive oil
- 1 teaspoon dried thyme
- 1/2 teaspoon salt
- 1/4 teaspoon black pepper
- Optional: 1 tablespoon Dijon mustard
- Optional: 1/2 cup apple cider or chicken broth
Equipment:
- Sous vide cooker
- Vacuum sealer (or zip-lock bags and water displacement method)
- Large pot or container for the sous vide water bath
- Instant-read thermometer
- Cast iron skillet or other oven-safe pan
Instructions:
- Pat the pork roast dry with paper towels. Trim off any excess fat if desired.
- Season the roast with olive oil, thyme, salt, and pepper. You can also rub the roast with Dijon mustard for extra flavor.
- Vacuum seal the roast if using a vacuum sealer. If not, use the water displacement method with zip-lock bags.
- Preheat your sous vide cooker to the desired temperature. The ideal temperature for pork loin is between 137°F (58°C) for medium-rare and 145°F (63°C) for medium.
- Place the vacuum-sealed bag in the sous vide water bath and cook for the desired time. The cooking time will vary depending on the thickness of the roast. A 2.5-pound roast will take about 4-5 hours at 137°F.
- While the roast is cooking, prepare the pan sauce (optional). Heat a tablespoon of olive oil in a cast iron skillet over medium heat. Add 1/2 cup of apple cider or chicken broth and scrape up any browned bits from the bottom of the pan. Reduce heat and simmer until the sauce thickens slightly.
- Once the roast is cooked, remove it from the bag and pat it dry with paper towels. If desired, you can sear the roast in a hot cast iron skillet for a few minutes per side to create a nice crust.
- Slice the roast and serve with the pan sauce (optional) and your favorite sides.
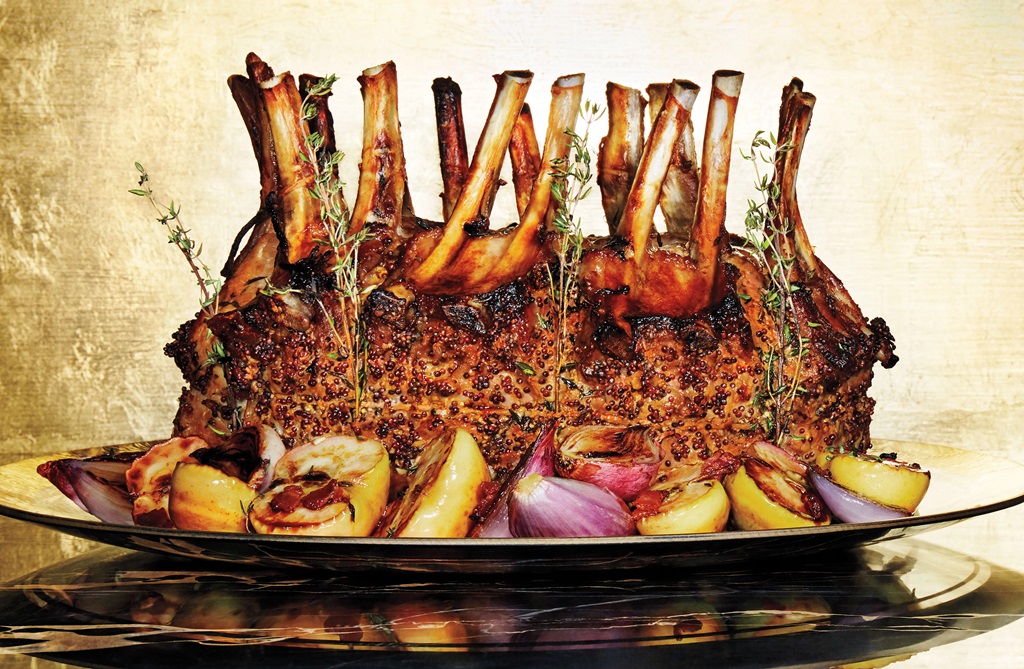
The Promise of Melt-In-Your-Mouth Tenderness
As you slice into the roasted exterior, prepare for the meat to practically fall apart, oozing with juice. Each bite features a tantalizing contrast of crisp, salted crust giving way to unbelievably succulent meat. Infusing low, slow heat directly into the middle of this large cut means moisture stays locked in. When protein fibers relax and break down, dryness doesn’t stand a chance! Expect a buttery smooth texture and exotic spice notes. I love serving this impressive yet easy crowd-pleaser for holidays and special gatherings. The minimal hands-on time frees you up to focus on sides and mingling with guests. Let’s get started making the best sous vide pork loin you’ve ever tasted!
Shopping for the Perfect Sous Vide Pork Loin Roast
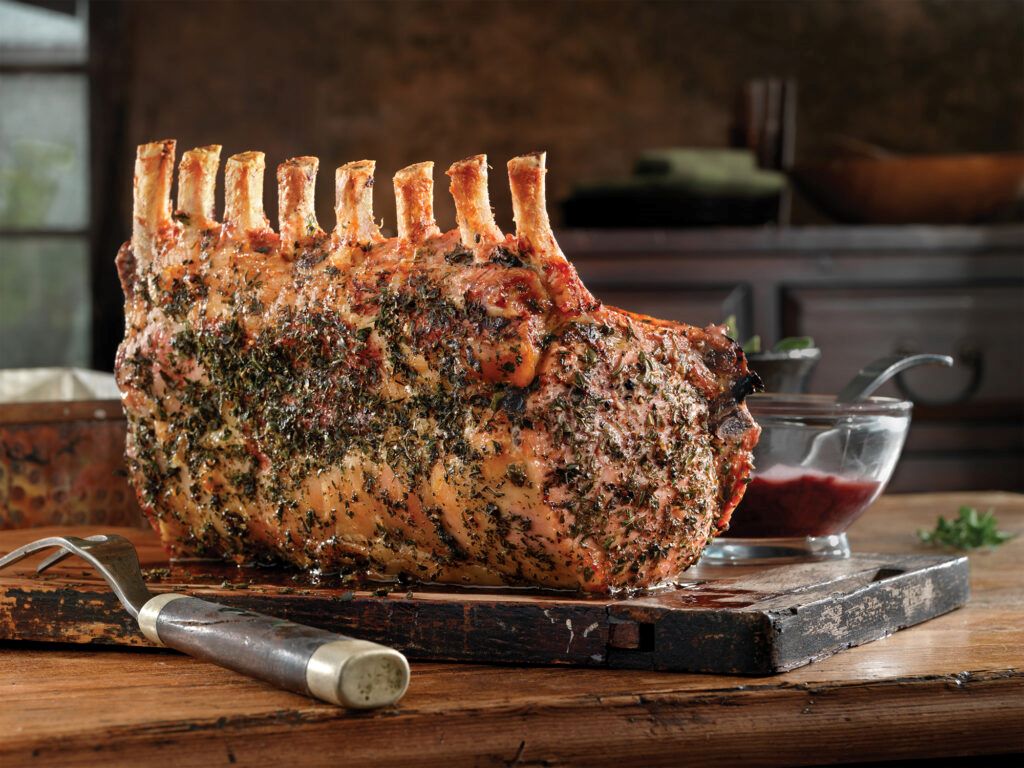
In my opinion, bone-in sous vide pork loin roast is far superior to boneless when cooked sous vide. The bone impacts moisture and imparts extra flavor. Search for a roast about 3-5 pounds with a thick layer of fat along one side. Choose the longest, thickest cut possible for the most impressively even results. Sometimes this roast is labeled “center cut.” While center cut chops come from this section of the pig, leave your roast in one giant, glorious piece.
At the store, the color should appear pale pink and feel cold to the touch. Examine it closely for any indentations or cuts in the surface. A smooth exterior allows for better browning later when searing. It’s common for one end to taper into a point which cooks slightly faster. My advice is to position the tapered side near the top of your water bath. Heat circulating around the less dense portion helps even out the temperature. Now that you have the perfect pork loin, it’s almost time to cook! But first…
Prepping Pork Loin for The Water Bath
Preparation truly makes a difference in creating that gorgeous crust. Start by patting the meat dry with paper towels. Then, generously coat all sides in salt and pepper. The salt helps season the meat all the way through while also aiding in the critical maillard reaction later.
The next step is totally optional but makes a huge impact. By quickly searing each side before it goes into the sealed bag, you amplify depth of flavor. I sear over very high heat on just the fatty side and two smallest sides. Don’t worry about cooking it at this point – the goal is to impart flavor via browned bits stuck to the surface. This extra attention to detail pays off when biting into that first amazing slice.
Now, place your seasoned and optionally seared roast into a sous vide bag, trying to remove as much air as possible. Some people add other flavor agents like fresh herbs or broth to the bag, but I prefer to keep it simple. The pork releases plenty of savory juices while cooking. After water displacement or vacuum sealing, it’s finally time to submerge your bounty into the brisk water bath!
Finding Sous Vide Nirvana
Dialing in the right temperature and timing is imperative for texturally perfect pork loin. After much experimentation, I employ these parameters:
- 145°F for 8-12 hours
- 148°F for 5-8 hours
The longer end of each range allows for extra large roasts, while the shorter times work for average sized cuts around 3 pounds. For food safety with whole cuts of meat, you need to hold the interior temperature at 136°F and above. 145-148°F gives just a hint of rosy pink inside while dissolving all the collagen and connective tissue. The window between juicy and dry is small with lean meats like pork loin. These temperatures walk that line flawlessly.
Around the 5-6 hour mark, I recommend checking for doneness by piercing the thickest part with a thermometer. Once it hits the 140’s, you’re good to go. However, allowing it to remain in the water bath intensifies succulence and tenderness, so I often let it go a full 8-12 hours. This flexibility makes sous vide a busy cook’s best friend!
Now that your pork has bathed long enough in sweet sous vide spa treatment, it’s time to finish it with an ultra crispy crust via high-heat searing.
Developing a Beautiful Crust Through Searing
A well-browned crust provides not only aesthetic appeal but also a fantastic textural contrast to the meltingly tender interior. Because sous vide cooks in a sealed bag submerged in water, you miss out on the caramelized bits and intensified flavors dry cooking methods achieve. Searing after the long water bath makes up for this in spades!
First, thoroughly pat the pork completely dry with paper towels. This helps facilitate optimal maillard reaction and prevents boiling or steaming from residual moisture on the surface. Place a skillet or grill over the highest possible heat. While it comes up to temp, rub the roast with a thin coating of high smoke point oil. I prefer avocado for its mild flavor.
Wait until the pan starts smoking heavily. This indicates it’s crazy hot – just what you want for a good sear! Carefully place the pork in the pan and listen to it sizzle. Don’t move or mess with it too much initially. Let it set and turn deep brown for 2-3 minutes undisturbed. Then, flip to another side and allow the same. Repeat all the way around, ignoring any curved edges or uneven parts. The bone protrusion usually can’t make solid contact so I don’t worry about browning it.
I love how the salt and pepper transforms into a beautifully caramelized crust. Take it off heat while still slightly under your desired doneness. The hot pan continues intensifying color for a few minutes after removing. Letting the roast rest now allows juices to redistribute evenly throughout.
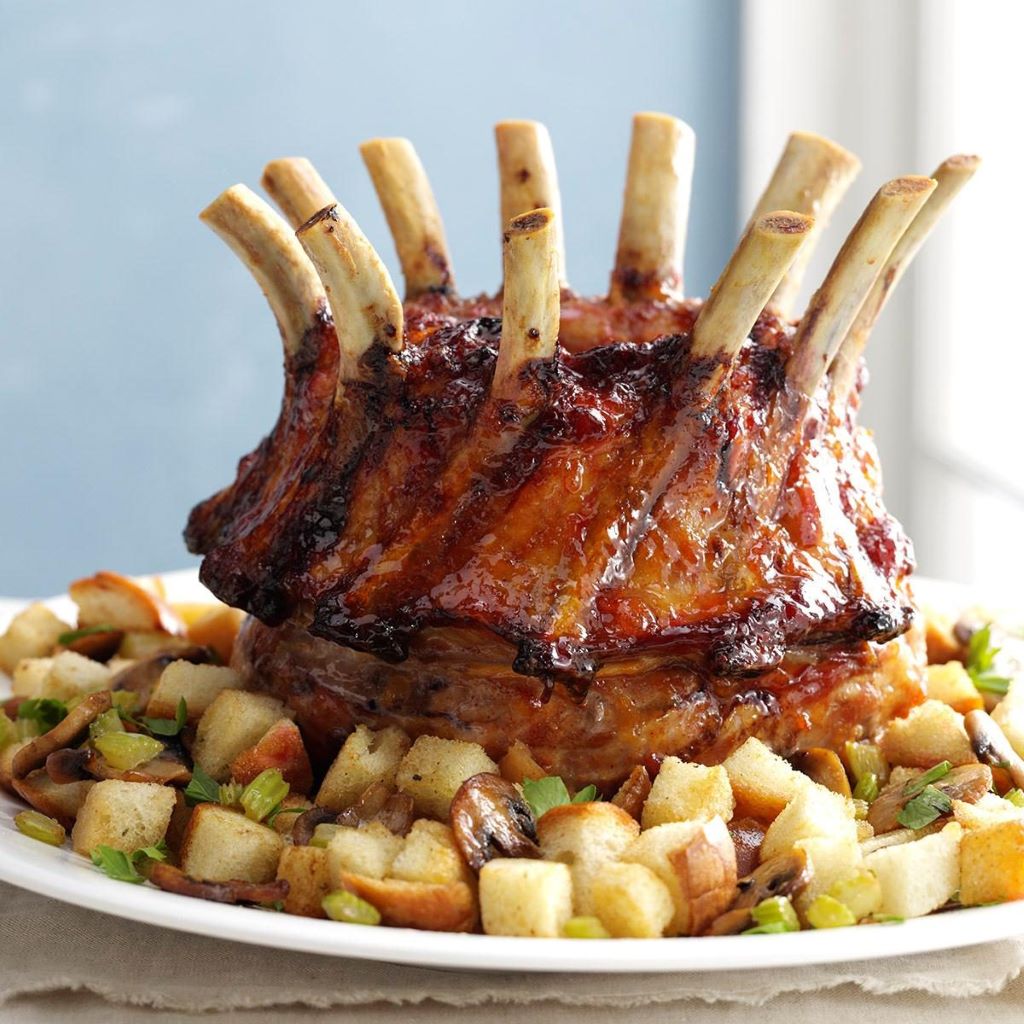
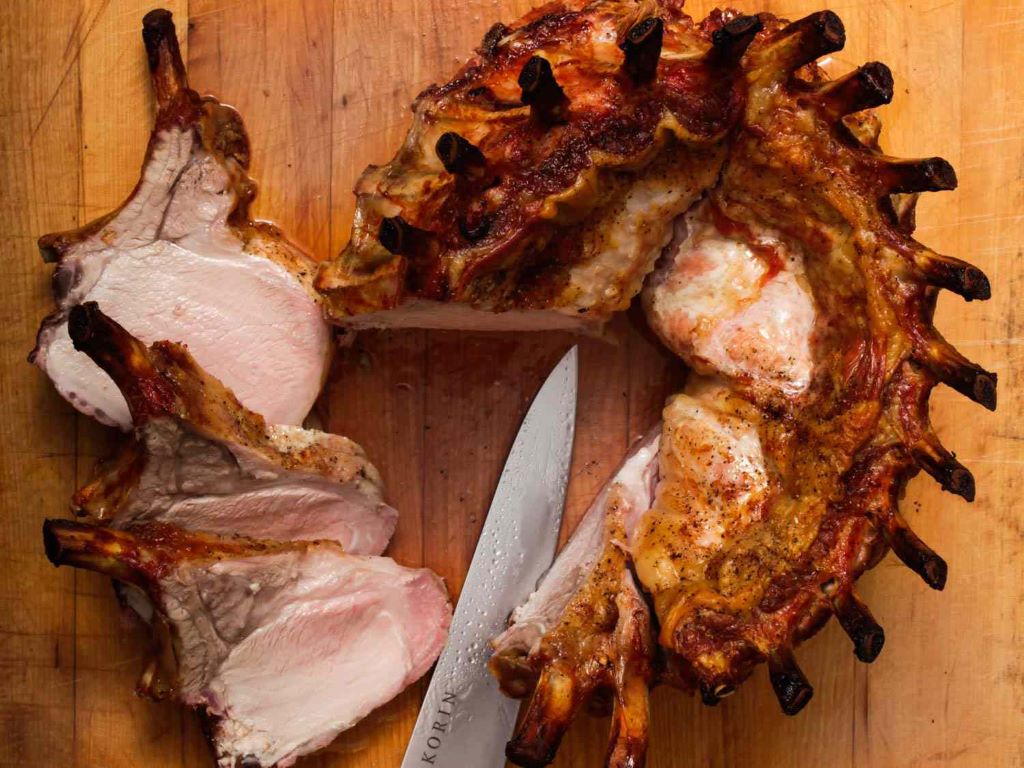
Time to Slice Into Sweet, Succulent Perfection
After all the waiting – it’s finally time to see your dedication pay off! I recommend letting the roast rest for at least 5 minutes before slicing to allow juices to settle. The anticipation kills me too, but it makes a difference. Start by cutting thin slices against the grain of the meat. This goes against our normal instinct to slice with the grain, but cutting perpendicular to the muscle fibers shortens them for a more tender bite.
My mouth waters imaging your reaction to that first taste…The crisp salty crust cracking open to reveal ridiculously succulent meat! Each slice features a thin band of delectable fat permeating mouthwatering flavor and moisture into the surrounding meat. Hints of spice mingle with juicy pork essence flooding your senses. Winchester Farm Apple Cider Pork.
Serving Suggestions for Stunning Presentation
A meal centered around this opulent pork crown jewel elicits ooh’s and ahh’s before anyone even takes a bite. For maximum visual impact, I recommend carving it tableside for your guests. Centre the succulent roast on a large wooden carving board surrounded by complementary sides and sauce options. The natural curves of a horn-shaped board perfectly cradles the long shape of traditional pork loin.
My favorite pairings include fluffy smashed garlic potatoes to soak up the copious juices and bright lemon-dill asparagus to cut richness. A sharp horseradish cream or whole grain mustard sauce ignites the savory qualities. For dessert, offset the hearty main with a tart lemon sorbet or sweet-tart apple compote. Take your guests on a journey through the dance of flavors, textures, and aromas showcasing your pork as the star of the show. You accomplished a serious feat – now sit back and let the compliments roll in!
Storing and Reheating Leftovers
Somehow, if you manage to have any remains after presenting such a show-stopping roast, consider yourself lucky! Cover tightly with foil or an airtight container. Refrigerate up to one week or freeze for a few months. Reheating maintains impressively high quality and tenderness. Let frozen portions thaw overnight in the fridge before reheating. Chopping or shredding makes unique sandwiches, tacos, or topping for hearty greens and grains. Otherwise, simply reheat gentle slices wrapped in foil in a warm oven until warmed through. Now that you know my tricks from shopping to storage, let’s cover some common questions.
Frequently Asked Questions
Do I really need a sous vide machine?
While extremely helpful, it is possible to achieve similar results with careful attention via traditional methods. Use a digital probe thermometer and roast low and slow in the oven at around 250°F until the thickest section hits 140-145°F. Then sear the exterior in a hot pan. It requires babysitting but can work in a pinch!
Can I cook from frozen?
For food safety, it is best to thaw pork in the refrigerator before cooking sous vide. Starting from frozen changes the timeline required to sufficiently pasteurize and eliminate harmful bacteria. Thawing also helps the pork cook more evenly.
What about seasoning the bag?
Many people add herbs, broth, or other liquid to impart extra flavor during sous vide. However, I find bone-in pork shoulder releases plenty of tasty juices while cooking. Keeping the bag simple allows the pure pork essence to shine. Additionally, liquids can sometimes cause the bag to puff up which makes achieving a good sear difficult. But if you want to experiment, try low-sodium chicken or pork stock.
Should I take the pork out of the bag before searing?
Properly drying the exterior is the most critical part of good searing rather than worrying about the bag. However, removing it can make the process easier and allows any accumulated juices to drop off. As long as you thoroughly pat it dry immediately before searing, you’re good to go!
How should I cut pork loin for serving?
Always slice against the grain of the muscle fibers after resting, no matter the cooking method. This shortens the fibers so they break apart more easily while chewing. Result: incredibly tender meat! Resist the urge to slice with the grain and see how it makes pork loin melt-in-your-mouth delicious.
Satisfaction Guaranteed
While these sous vide pork loin roast takes some patience, the foolproof methods outlined here guarantee lip-smacking success. Sous vide transformed my pork loin from dry and mild to incredibly succulent and flavorful. Impress your friends and family with your mastery of an innovative cooking technique as you follow this step-by-step guideline on how to steam tamales without a steamer. I hope you find the precise pointers here as helpful as I do on repeat journeys creating this sublime roast. Now, get out your thermometer and go enjoy fall-off-the-bone pork perfection!